Translate

Showing posts with label 15mm. Show all posts

Wednesday, January 26, 2022

AAR: Battle of Gunzburg, October 9, 1805

Mack Disregarded his officers' recommendations to retreat to Vienna and opted instead for an active defense in and around Ulm. Mack Ordered d'Aspre's force to defend the Gunzburg bridges. Meanwhile, Ney was ordered to take all the bridges between Gunzburg and Ulm in order to link up with Lannes and Murat who were already on the south bank of the Danube. Ney quickly moved Malher's 3rd Division towards Gunzburg with orders to take the bridges.

 Austro-Hungarian center around Gunsburg. Ruffer's command is defending the crucial center bridge.

 
Austro-Hungarian units on the right around Reisenburg. De Melgum's command is around here. 
 
 
The Austro-Hungarian left around the village of Leipheim. Reinhardt's forces on this flank protecting this bridge.
  
The French under General Mahler's ten battalions all enter onto the field from the main road and fan out to the flanks. Going against the town of Reisenburg has been assigned to a battalion of converged elite companies under General Lefol.   
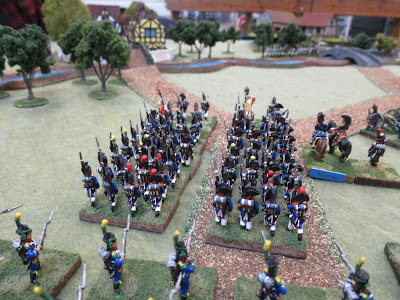
 
Up to the center. The artillery on both sides are hampered by forested areas all long the river. This works against the interest of both sides as it prevents softening up defenses or offensives. It is all going to come down to the bayonet. 
 
General Lebasse's two battalions of the 59th Ligne can be seen going for the bridge at Reinhardt. The yellow 4-sided dice are representing damage done the the bridge by the defenders. Before the French can make it all the way across, the French sapeurs have to successfully make a repair. Michael Hopper's scenario doesn't call for multiple damage points and doesn't permit destruction of the bridges. So we decided to try potential multiple damage points to see how it would play out. 
 
The French here are also attempting to get onto the bridge to conduct a repair with the sapeur as seen in the bottom right of the picture. 
 
After clearing some of the damage, one of the early assaults pushed this leger battalion back across. This will repeat until turn 12. Assault after assault here just could never break into the town of Gunzburg.

No, the defenders didn't all break and run... well yeah, actually they did. I forgot this flank as I didn't think this lone elite battalion could do anything more than tie down units here. As it turned out, the Austro-Hungarians came across the bridge and prepared to attack. The French didn't wait for them to position themselves and attacked and broke two infantry battalions and repulsed the Austrian kuirrasier unit without the need for square. Because this command was effectively demoralized, it broke. All that and I didn't have a chance to picture the only successful part of the field. One bridge is captured.

And this image is effectively all that happens on this flank for the entire game. The Austro-Hungarians here only got their flank shot by the French guns before they high tailed it behind the trees (you can sort of make them out). The enemy infantry kept lively fire upon the French as they attempted repairs just as fast as the enemy could inflict them.

 
To add some pressure to the center and take advantage of a non-existent Austro-Hungarian right flank, the converged elites storm the hill and move to the center as if in preparation for Austerlitz a couple of months later. The Austro-Hungarian command now has to shuffle around some resources to stop this.


Austrian artillery is brought up to support this line battalion opposing this French advance. In ordinary circumstances, the line battalion would not do anything more than act as a speed bump.


With the damage temporarily repaired, an assault into the edge of Gunzburg commences. Will the hard work of the sapeurs and leger finally pay off?

This battalion of the 59th ligne had to back off the bridge voluntarily. Too much hot lead was inflicting disruptions that were risking the unit being broken. The enemy sappers are able to keep damaging the bridge. Maybe the idea for accumulated damage for bridges wasn't necessary.

 
The damage has been cleared and another assault on the town's edge is conduct. The enemy unit protecting the flank of the town is now free to down toward the river. Lefol's converged elite battalion has backed off once combined arms of infantry, cavalry and artillery are brought up. Only the Austro-Hungarians have any cavalry and if for nothing else, will cause some French hesitancy for turning the entire flank and hitting the center.

 
The French guns are silent with nothing to target. The infantry and sapeur labor in vain as can never get far enough across to assault the Austro-Hungarian troops. 

For a minor victory, the French only need to secure one bridge and that minimal objective was achieved. Historically, the above flank that was turned, not the other end. In conclusion, I don't believe the scenario written by Michael Hopper in Rise of Eagles is in anyway wrong, just the rules in Lasalle don't lend themself to assaults in columns for assault across a bridge. The forested areas also prevent line of sight and so the artillery has no real effect. We still enjoyed the game and more unique situation of the scenario.

Sometimes, repeating historical results are more difficult than it might appear.

Tuesday, July 6, 2021

AB British Napoleonic Royal Navy Ship's Boats


 Another project cleared from my to-do list were a couple of Royal Navy boats. Doing Corunna has always been a bit appealing and as in Wargames Illustrated Corunna display, just really nice to look at.

I went with seated soldiers as opposed to the seated marines option. One day this may get worked into a convention game where there may be some landing and these will be useful. This was fun to paint and I got to paint some of the striped pants for the sailors.

I used Liquitex modelling medium/gel for representing the waves. A solid layer of blue paint followed by multiple colors of drybrushing to achieve the peaks of the waves. A fun set to paint and try something different.

Friday, April 16, 2021

15mm Peninsular Windmill And Spanish Limbers


So after a while of not posting about Peninsular related  posts, finally we get back to to the main theme of the blog. Who knows how long before they appear on a table in a featured after action report.


Around Christmas of 2020, I came across the web site https://www.jjgprint3d.com/ and the unique 3d printed models. I picked out some items and considered shipping costs and hesitated. The prices for the figures are reasonable enough, shipping is a little pricey. After placing an order and receiving the models, I was not disappointed.

 
The limber, draft oxen and crew are all cast as one piece. That is a little unusual but not prohibitive to painting. There are a few hard to reach spots, but not impossible. The models have sufficient detail and do not require any removal flash. They will look great on the table and fit in with a Spanish army.

Many years ago, I placed an order directly to Hovels but did not spend the few extra pounds to get the windmill to complete the entire Spanish set. Last year I acquired the final piece and have now finished it up.

The windmill needed to be mounted to a wide base to keep it upright. Although the structure is made from resin, the lattice is all pewter. The pewter of course makes it strong and not as brittle as resin, but is heavier. I kept the the coloring in line with the rest of the Spanish buildings. 

Sunday, February 14, 2021

15mm Bavarian Towns

 While I may not have been actively posting on this blog over the last few months, I have still been busy working on projects. One project, just finished up in January, were these Bavarian towns. I wanted suitable buildings before doing such a project and I ran across some SHQ and a few JR Miniatures buildings that seemed to work well. 

To get the look right, I studied various images of Southern German town images on the web. Remnants of such period buildings exist and they present a colorful and cheerful appearance that I wanted to imitate. As such, I tried to use colors and objects of life to give a good representation.

The walls were the one part that made me the most uncertain. At first, I wanted to go with generic rock walls. Such a look would not be entirely wrong and would offer texture and relatively little painting challenges. On the other hand, stucco or white-washed style of walls were also common for more developed areas. The lighter color of a white-washed or stucco wall does brighten it up. Had I gone with rock walls, it would just give a bit too much gray when considering the cobble stone streets.

For the walls, I used cork board along with balsa wood cut to act as posts and buttresses. The cork board has the texture and the flexibility to curve where needed. It also cuts easily and after being painted, stiffens up.

I ran across a 15mm accessory pack from Musket Miniatures that had supplies, ladders and tree stumps. I forgot to include a picture of the wagon loaded with barrels and bags. As much as I wanted to include lot of additional items, I didn't want to clutter up the town and risk not being able to place figures.

I chose to use hardboard for the base and then further stiffening that with glue and sand for the area around the town. I made sure to leave handling room along the perimeter so as to protect the walls from being pressed when being picked up.

This well on the left is from Brickdust Miniatures. The trees are removable for both storage and for game play.

Having learned from my Peninsular towns, I used the same construction for the walls and basing material. Rather than just use a more natural ground effect for inside the town, I went with the iconic cobble stone look. There are different options for this, from rubberized pieces with the cobble stone appearance or rollers with the design upon them that can be rolled over a medium to leave such "tracks". Being unsatisfied with those options for a wider area, I went with high quality printed cobble stone paper packs that are designed for a seamless fit. This turned out to be much cheaper and flatter than the other options. 

Now my Austrians have a good scenic place to invade when they attack my Bavarians.


Wednesday, August 19, 2020

The Alamo

https://drive.google.com/uc?export=view&id=1F2WDB0bLTw-pNDhxlfnE3Tt-iV9D82xT
The Alamo scenario is a game that most people would presume is a forgone conclusion. How could the defenders win? As it turns out, if they had inflicted enough loss upon Santa Ana’s army, then it would change the course of future events. That was the scenario we had planned along with the historical setup.
https://drive.google.com/uc?export=view&id=1X2Q3xKAiV1sFSaUovhPrQenrxI9NoU2Yhttps://drive.google.com/uc?export=view&id=1QcGMeYgc9PIixgKgIQcBGHPuI2n5JuQt
Not having enough Mexicans to represent the force, command stands with Mexican flags along with French line infantry were used. At this scale, it seems to work just fine. All the Alamo defenders were represented 1:1.
https://drive.google.com/uc?export=view&id=1d3AKG9eb2uRIfrh8DRmPVb97ddtekbfqhttps://drive.google.com/uc?export=view&id=1c2Eb0jYp_KfHvsK5iY3D_FwMoYIpjEa8
https://drive.google.com/uc?export=view&id=1Bj0TjUK5UszAOZ1aequeFG1eVVxJO-W3https://drive.google.com/uc?export=view&id=1jQCKCoNoBvLRdJBVHCaPHoivNLurgnuw
https://drive.google.com/uc?export=view&id=1ooLLfJCWSRhPtJj4BbC3EJo1Hyld8Rjnhttps://drive.google.com/uc?export=view&id=1ykmNM5ak8TWgn486g0qaS5wNJ2iFSWTU
https://drive.google.com/uc?export=view&id=1q5aUvvwHhY0vHtJtVs2JVXgFEz4rWvvzhttps://drive.google.com/uc?export=view&id=1ur3QJf8BM3Kju16884dpC-kpHAxCy5wK
https://drive.google.com/uc?export=view&id=1JsZtJo95H9tQ-c-upobv6mI0Iuoe4zLRhttps://drive.google.com/uc?export=view&id=1vGKB6Bf5zifIxK034hhwgkt0OeYHck64
https://drive.google.com/uc?export=view&id=1-uCI5b7AqUY8HjFBVK_Nngo-PlaAPka2https://drive.google.com/uc?export=view&id=11cLyZXItc9ogG6LuahTwBVDtmseWa8xs
https://drive.google.com/uc?export=view&id=112je5NMxaKUzdfXoCp3Uw8z7D7UcLWPBhttps://drive.google.com/uc?export=view&id=12XwSiRr3dxxeEclYtQEdBZrv-GBKds1A
The western wall would be overwhelmed, but not before chewing up most of the attacking companies. 
https://drive.google.com/uc?export=view&id=1nQ0vlA6fOgEdksRtSEUTgrpld8pKLeog
The northeastern corner was where the slowest progress was made. Part of the walls did not require scaling ladders, but the gunfire here was intense. To the left of the picture in the Chapel, cannon fire aided the defenders from a higher elevation.
https://drive.google.com/uc?export=view&id=1X3xP95RDwl8eOLSQRMtd_OnMsKcVHiMh
https://drive.google.com/uc?export=view&id=1_ye3pOQmObPilRQ1FLDrepJpXi_oIjTMhttps://drive.google.com/uc?export=view&id=1gh0wNX6exxcsgpCe9wusnVBTsFTH24Nd
https://drive.google.com/uc?export=view&id=1qoKEfpGVhOeRocTwH2mXw2DmPh_al5o2https://drive.google.com/uc?export=view&id=1mb-svf7LBdlwZ_gjMNAapovs26a8PU_w
https://drive.google.com/uc?export=view&id=1R0rIV6Ln5RXdCxUrVMTPjvJ_VtkKEiYOhttps://drive.google.com/uc?export=view&id=1YC_MvjkTnam8nFXYeDCuff9pIOcQQRknhttps://drive.google.com/uc?export=view&id=1GErfOPktBbJfGMPiX17DDACF35guohlz
https://drive.google.com/uc?export=view&id=1pjph1-T4KKpiPm0JzLF60Ax0x-2konEOhttps://drive.google.com/uc?export=view&id=1dw-Hr9PUfy8-v-8DPDuziBOd0jHUp7wP
https://drive.google.com/uc?export=view&id=17KIXOPu3CqLd5NhZbRKysPpr-qPi_ir-https://drive.google.com/uc?export=view&id=1V-g1XFkSQ1xi-hxc-TqNa7ZNunqJf5IW
https://drive.google.com/uc?export=view&id=15-Lp6VxBM-Ksk3yq4WfTjIJHDW7BLYlThttps://drive.google.com/uc?export=view&id=1QFoBQtQvnT3W5_qMuyZGkTma8DlozftC
https://drive.google.com/uc?export=view&id=17n6GX4KaHIfRo3o0GAKiHpaI8LijRKb5https://drive.google.com/uc?export=view&id=11hSKL78StSjarUcSRCa2jc7nZcFnjDC-
https://drive.google.com/uc?export=view&id=1kBenTTC_ZYZOZ1JxzCLL-F3KCJDIc07ghttps://drive.google.com/uc?export=view&id=1OcJMLIVuFGjW6if1hYR6N0S0CHFfUusk
https://drive.google.com/uc?export=view&id=1KNYwa1YOrTWzPTGDldumN0qI1SUe-QDChttps://drive.google.com/uc?export=view&id=19VKcjNWu-xoRRmBTpa2ruXwrMiyWYUIr
https://drive.google.com/uc?export=view&id=1BtzKrge8KQSZs0VlCEPcJSZnys7lfQdhhttps://drive.google.com/uc?export=view&id=18mqLDW1QFQrhZUqU0byN1IF-qwDa5t_P
https://drive.google.com/uc?export=view&id=1bwBFMHbvHLI6LqOrh4hM687OXIGMOAdshttps://drive.google.com/uc?export=view&id=1PruLNhEPLt1AdwSYolfB4rk1q_QpkwPb
https://drive.google.com/uc?export=view&id=1Crfl16AttYEca7NmXWQBN5ctQgA7qAHxhttps://drive.google.com/uc?export=view&id=1SaEVYKHW22jKFlF2VeeA0BUAhzKkvxwy
https://drive.google.com/uc?export=view&id=146gHIFdLOYGImJM0vJmAJYxbFTyItDQehttps://drive.google.com/uc?export=view&id=1OCtfs9linn67h9d7NCQaUks19IOEFISe
https://drive.google.com/uc?export=view&id=1rJ4OghXza08IFKzbKCq4MSPrsse1-j-Jhttps://drive.google.com/uc?export=view&id=1IYaaMAWX5eWopeBVM8HIQ59a_6alxQ6K
https://drive.google.com/uc?export=view&id=1GVv0pLT1nE51rBcqwW1sMcnURavcxM5Zhttps://drive.google.com/uc?export=view&id=1kUwLUL3DcvJd1p_0ENQa2HqE7Fil4m-b
https://drive.google.com/uc?export=view&id=1wtzMK2kB-E5GopSxDN9L0uUqZFa5FfpVhttps://drive.google.com/uc?export=view&id=14TNiefGtqLHpe1Up1eoLKgRM_Br4qhlNhttps://drive.google.com/uc?export=view&id=1DfZqn2U54x781uefxfjeVejTDSas5bJ-https://drive.google.com/uc?export=view&id=1GLj29greqB94z4L7QgmiwyZgiq1W46Bkhttps://drive.google.com/uc?export=view&id=1gTlpCK0vIQV-wERZxK04SZaXSgeuIr7Bhttps://drive.google.com/uc?export=view&id=1_meRZEVSllqEYuXlH43Pwq4SD6NNGoRfhttps://drive.google.com/uc?export=view&id=155AVwOkFYpxd2hhyvpUINY3MHQqOMsQthttps://drive.google.com/uc?export=view&id=1Jyj034HNkS9_TR29G1EawT7j5yXYWCNXhttps://drive.google.com/uc?export=view&id=1cS3OqUSsWsZ_m8J4_XaW5TgjfBWhUfRM
The result was a bit surprising, but did make sense. The cannon inside the Alamo made the real difference. Those guns could cause enough damage to blow away platoons with ease. Since the defenders were fighting unto death, they did not need to worry about morale or a line of retreat. The defenders had the advantage of a target rich environment along with hard cover. After six hours of playing, Santa Ana got his Pyrrhic victory. The defenders saw to it that the army Santa Ana walked away with was greatly reduced.